Showing posts with label 2013. Show all posts

Sunday, April 5, 2015

Model #6 Revell Wright Flyer 1:39

The Wright Brothers legacy as aviation pioneers is one of the most famous stories you've never heard about.


Their inaugural flight at Kittyhawk is rightfully well known, but their accomplishments and failures are far more compelling than their famous but otherwise pedestrian flight.

The reality is a significant portion of the technology used on their original flyer was already well known. Even their patented wing-warping wasn't momentously groundbreaking. One of their most important contributions is their realization that a propeller is actually a wing in rotation. Their contemporaries mistakenly considered propellers to be like their water based cousins, pushing water back to nudge a boat forward. The Wrights ingeniously discovered the characteristics of lift could be applied vertically as well as horizontally. Further, their wind tunnel tests were strikingly accurate, with their propellers achieving nearly 80% efficiency. After a hundred years of research and enormous advances in technology, modern propellers achieve roughly 85%. For the Wrights to be so close on their first attempt is truly amazing.

Speaking of amazing, I'll shut up and get back to the model.

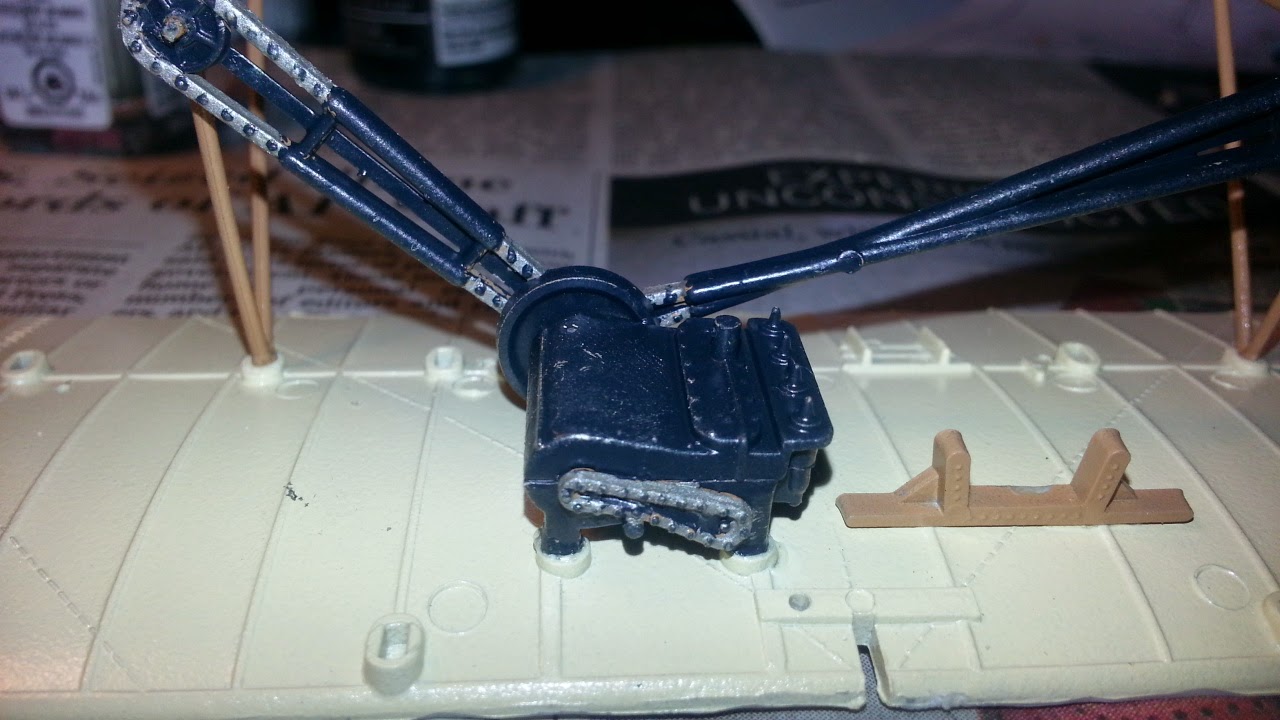
This one had a number of intricate parts and required all of the limited skill I had. I began with Charlie Taylor's engine, which is much easier to detail prior to installation. I kept it simple:


(ProTip: Don't forget to paint the strut mounts before assembling the wings like I did. In fact, you're better off painting everything before assembly.)

Everyone has an opinion on what their most vital piece of modeling equipment is. See if you can spot mine:


Here you can see the control mechanism on the canard. Ironically, it was the Wrights' self-destructive obsession with enforcing their flight control patent that allowed others to surpass them by orders of magnitude in the user friendly department. (The Wrights feared embracing new technology would weaken their case.) Even before they they won, and lost, and won and lost their lawsuit, their flight control system was laughably antiquated and was despised by pilots as counterintuitive, complicated, and unsafe.


None of these three parts were especially easy to assemble, but the worst was yet to come.


The most difficult part of this model was the installation of the control wires. This string became the bane of my existence and was a true pain in the ass. Revell gives detailed instructions and even goes as far as stating "patience" is required. I can't say I've ever seen a manufacturer give a pep talk in their modeling instructions before.


Revell designed this kit with a hook and loop system to run the string through the interplane struts, in addition to threading it through tiny holes in the wings.


Personally, I consider time to be a precious commodity so I cheated to speed up the process. I used Insta-Set to quickly lock the string in place. I'm not attempting to build a museum quality piece, and this method worked just fine for my standards.


In the end, the string really tried my patience and I was very happy to finish this one. Overall, I'm satisfied with the way this model turned out.


This is about as much cockpit detail as you're going to get out of me. (Not bad considering, as a result of my poor planning, I had to paint it after assembly.)


This shows a little more of the complex string work required.


It looks just fine on the shelf next to my Goose project.


The Wrights are justifiably honored as aviation greats. They weren't just pioneers, but brilliant creators as well. Unfortunately, their most impressive contributions to aviation are overlooked by most. Likewise, their obstinance and pettiness is often dismissed or glossed over. Their lack of vision not only contributed to their relative failures as businessmen, but their unjustified litigious assault on anyone even remotely involved in creating new aviation technology most likely stalled progress in the field.

Revell delivered for me on this kit. As big a pain as the string was, I don't think there's any other way it could have been done. To their credit, the directions were as clear as possible and the parts fit well. It's unfortunate they don't make this in a 48 scale, though I'm unlikely to attempt this one again if they ever do.

I was ready for an easy project after this one, but I'm glad I did it. If I'm going to build a collection of historically significant aircraft, I obviously had to include the one that started it all.

Happy building!

While the Glue is Drying:
  
Revell includes a color photo pamphlet in this kit that offers several tips, including for building a diorama. It's worth a look and will probably be appreciated by more skilled modelers. They also include two figures, the original ramp, and other accessories so you can recreate the famous picture of the first flight. That's not my thing, but someone over at Airfix forum has a nice example.

Sunday, July 13, 2014

Model #4 Lindberg 0A9 Goose 1:48

This plane is one of my personal favorites and it was on top of my building wish list. It would also serve as a test of my (slowly) improving abilities as I was hoping to build a specific Goose as opposed to the typical production model.


When I was a boy there were few people in the world I wanted to be more than Jake Cutter. If you're not familiar with the name, you might not be old enough to remember the criminally short running TV series Tales of the Gold Monkey. Jake Cutter flew a Goose, and Jake Cutter was cool. Have a look for yourself:


For a young boy already in love with airplanes and Indiana Jones (for whom Gold Monkey was clearly a copycat), Jake Cutter was just about as perfect a hero as I could have. Despite the show's short run, it served as a constant inspiration to me. (Finally, after nearly three decades, long suffering fans were rewarded with a DVD release of the complete series.)

The model itself is fairly straightforward. It seemed inferior to the Revell kit I'd built. Also, for a 1:48 scale it seemed to have both too much detail and not enough. This model had roughly 20 bajillion prominent rivets on the skin, but hardly any interior to speak of. This wasn't a problem for my purposes. The windows appeared too small to be able to see much through them anyways, so I painted the interior with a flat brown hoping it would dull the glaring white of the plastic. As you can see, there was also some fit issues as well:


I was able to add putty and sand these problems out up to my standards. But if you're more serious than I am, it's worth noting that any sanding you do will eliminate the rivets and create a smooth spot:


The biggest challenge on this build proved to be the paint. Masking required a great deal of thought and effort for a new guy like me. In addition, I was still using spray cans at this point. I typically like to make painting a two step process and lay down the main color first (on the sprue), then build, and touch up and and add detail. I couldn't really do that with this project and needed a plan. Obviously, the black on white scheme left little room for mistakes:


There seems to be some discrepancy regarding the top side paint scheme, and I did my best to faithfully recreate it. Thankfully there's a Tales of the Gold Monkey fan site with plenty of photos. This model shows it differently than in other places. I researched it as much as I could and came up with what I thought was accurate.

Another issue that became an obstacle was the propellers. The Lindberg kit is an early 0A9 model, which would be accurate for the time period Gold Monkey took place. But the show was notoriously inaccurate with regards to chronological accuracy (Cutter was supposedly a former AVG pilot several years prior to the AVG being formed). The Lindberg model includes a two-blade propeller while Cutter's Goose was the later G21A version with three blades. This being model #4 I don't yet have a developed scrap pile I can comb through to find extra parts. Thankfully I was able to scour my local hobby store's stash of spare parts and come up with some random (but matching!) tri-blade props. This photo depicts the original white two blade prop that came with the kit, the untouched (left) three blade prop, and the sanded down version (right):


I cut off the "stem" that fits into the "engine" from the original two blade props, and also cut off the prop spinners, then glued them on to the new propellers:


After paint, they look like original parts:


There was no way I would be able to recreate the iconic red swoop and "Cutter's Goose" lettering. A little bit of research led me to Draw Decals where I was able to find this set. They shipped fast and and seemed like quality decals. But I did have to make a cut for the wheel well:


I chose to use only the red decals, and opted to paint the black portions myself. Also, my research indicated Cutter's Goose had a black disc for the main landing gear wheels, so I went with that. I really struggled with these decals, and they required a great deal of shaping and cutting to fit but otherwise appeared to be spot on color and font wise. A more experienced modeler may not have had these issues.

In the end I I'm pretty happy with the final result:


You can see where I tore the decals on the port side. I used Model Master Chevy Engine Red to fill in the blanks. That's pretty close match and it shows up much more in pics than it does sitting on the shelf:


The white paint can be glaring, so to add depth I sprayed some cotton balls with grey paint and shoved them in the engine compartments. I think it was a good effect:


Here's the top end paint scheme I came up with. I had a great gloss finish on it with sharp lines. Unfortunately I decided I wanted a more flat appearance and tried to do it over by hand. That was a mistake:


In conclusion, I had a lot of fun building this one. It was great to connect with such an important childhood memory. I also enjoyed whatever skills I have being challenged. This model sits prominently in my home and it always brings a smile to my face. I won't defend it's craftsmanship or quality of build. But the subject matter makes me happy.

Sadly, N327 is no longer with us. Cutter's Goose crash landed in New York in 2005. But there seems to be a resurgence in interest in amphibian air travel (around my neck of the woods, anyway) so it would be nice to see more of these restored to airworthy condition.

Only the future can tell if the Goose ends up with the respect it deserves, or if it will remain an obscure novelty like the show it starred in. In any event I have wonderful memories of this plane and I'm happy to have the model to remind me of them.

Happy Building!


While The Glue is Drying:

This guy and this guy built great versions of this model.

Sunday, January 26, 2014

Model #3: Amodel Rutan Voyager 1:72

The Voyager flight had such an impact on my life that I simply couldn't wait to build this model. The aircraft's appearance is stunning in its elegance, and its story is inspirational. Unfortunately, it's not a popular model kit, and unless you're going to scratch build one, the Amodel version is about your only choice.


For those unfamiliar with the Voyager, it was a plane designed by the legendary Burt Rutan for the sole purpose of flying around the world, non-stop, on a single tank of fuel.

Circumnavigating the globe in an airplane had been done as far back as 1924, and a non-stop circumnavigation had been accomplished as early as 1949 using aerial refueling. But the feat of making a non-stop flight without assistance was truly an aviation milestone.

I followed the Voyagers flight as closely as possible, and as up-to-the-minute as 1980's technology allowed. The flight was a significant technological achievement, and proof that man has limitless potential. (And I don't think it's coincidental that a project this historic and revolutionary was funded entirely by private funds.) The impression the Voyager left on me is a big reason why I'm in aviation today.

As the Voyager was designed for a specific purpose, pilot comfort and safety were secondary, if not non-existent, priorities. The plane's poor handling and cramped space did not impress pilot Dick Rutan: "I got to really hate this airplane. I felt not only was it not going to work, but I would probably die in it."

This turned out to be exactly how I felt about building the model.

Frankly, even with my limited experience, I could tell this was a poorly manufactured kit. This accurate review posted by Fine Scale Modeler user EZSnapes sums it up:

"Overall the kit is crude. The parts are poorly molded with rough surfaces and poor fit. I have never spent so much time filling gaps and sanding a 1/72 model. The kit is also inaccurate in many ways. I corrected several small errors, most notably the front prop. Even though the fuselage is too flat, there is no mistaking the craft for what it is."

There's not much left to say. The model is a disaster with regards to just about everything. Check out the heavy flashing on the sprue (and take note of the cockpit piece on the right):


As you can see, you'll get a workout in the cutting and sanding department. Frankly, I don't think a single joint went together correctly on this model. That cockpit panel in the above pic was far too small to fit in the opening on the fuselage, so I had to get creative with the Window Maker:


The side windows had the opposite problem: The openings on the fuselage were much too small to fit the plastic windows. After many passes with the hobby knife, I gave up and filled them with the clear goop.

The instructions for this model are, uh, spartan.


Notice where the outboard tips of the canards connect with the booms. Despite their different positions, this is exactly where the slots were placed for connection: [UPDATE 11-29-2014: This is exactly where the slots were because that's exactly where they're supposed to be. In the book Voyager, Dick Rutan writes: "The aircraft's apparent symmetry is misleading. The right boom tank extends beyond the canard; its tip encloses the radar antennae."]


This was my first attempt at using a filler and sanding, and I used white putty from Squadron Products. It seemed a little dry while spreading on, but it sanded easily. My technique improved on later models.

In the end, there was simply too much fuss and frustration on this model and I couldn't finish it fast enough. The decals were difficult to apply, and the stand was flimsy (I cut the post in half which seemed to stiffen it up). I was more than happy to stop fiddling with this kit, and my bad attitude shows up in the final result:


Fighting until the end, this thing wasn't even easy to photograph. Here's a close-up of the main body:


This model wasn't fun at all, especially for a beginner on their third project. But this is such an amazing aircraft with an amazing story that I feel compelled to do it justice in the future. I look forward to rebuilding this kit once I have more experience under my belt. I've seen other hobbyists successfully build beautiful versions, so I know it can be done. For me, my next attempt at Voyager will have to wait until I have a dedicated workshop, and vast amounts of free time available. But when that happens I'm looking forward to getting this one done right.


Happy building!


While the Glue is Drying:

Some may note that I built the model showing the winglets. In fact the tips didn't make the journey, as a result of damage during takeoff as the fuel-laden wings scraped along the runway. This video showing the event is well worth watching:


Tuesday, January 7, 2014

Model #2: Revell F4U-4 Corsair 1:48

The Vought F4U is one of the most distinct planes of the WWII era and its striking lines make it hard to pass up for hobbyists. The inverted gull wings make the F4U easy to pick out from a mile away. The plane's significance as an integral part of Pappy Boyington's famed Black Sheep squadron makes this an irresistible candidate for a scale model build.


Every little boy knows the Revell name, and the reason why was obvious as soon as I opened the box. The parts were easy to identify on the sprue and the directions were clear. The design was complicated compared to my previous model, but the manageable size made this project far more enjoyable to put together.

One of the cool things about this model was the true-to-life folding wings. Unfortunately, I couldn't make mine work. Despite the overall quality of the model, the "hinges" for the wings were inadequate and unaligned. The tapered fit between the wing and fuselage didn't work either. After a ton of sanding and cutting, I was able to make them work (fold up and down). That said, the design was so flimsy, after a few rotations, both wings ended up breaking off.

I suspect a more experienced modeler would have been more successful, but that wasn't the case with me.

Here you can see my original (cutting) efforts at creating clearance for the wings to oscillate, and also the final solution of heavy glue to keep them attached to the rest of the model:


Although seemingly as delicate as the wing joints, the operable doors for the tailwheel are still working spot on. The wheel (and hook) both operate with a full range of motion and can be stowed away:


I also had a problem with the canopy. There was simply no way for this to fit. It either fit one half of the cockpit with a gap on the other (starboard) side, or it smooshed down on the pilots head and fell underneath the airframe. Luckily, I had picked up some of Testors clear parts cement and I was able to fill it in. Not a bad fix for a second timer!


The Corsair F4U is heavily armed, and I had fun building and painting the various missiles and bombs (with varying degrees of success):


I hand brushed Testors Burnt Iron for the cylinder heads and I liked the effect (Yes: I probably should have dusted her off before taking pics):


I'm pretty satisfied with the final product:


From the front, showing off the infamously massive 13-1/2 foot Hamilton Standard prop:


In conclusion, I had a lot of fun building this Corsair. The 1:48 was a much more agreeable scale to my skill level. In consideration of my space requirements and talent level I decided at this point to stick with the scale. For whatever reason, I actually enjoyed overcoming some of the minor obstacles I encountered on this build. I was excited to figure out a fix for the window. I didn't let the wing problems get the better of me, because things break, and this ain't going in a museum.

I struggled with painting the "frame" supports on the canopy, but it taught me that I needed better tools and I now own a fine set of size 0 and similar brushes for all sorts of detail work. I've noticed since this build that my knowledge grows exponentially with each project.

I screwed up the decals and selected a poor choice of paint color. I'm over it. I had a lot of fun building this one and it still looks great on the shelf.


Happy building!

Jeff


While The Glue is Drying:

This guy over at ARC built this model right. And he got his wings to work!


Wednesday, January 1, 2014

Model #1: Minicraft Catalina PBY-5A 1:144

[Note: This is one of the models I built prior to deciding I wanted to create a scale modeling blog. As such, the pictures and information are limited. I'm including this model (and post) for the purposes of maintaining a chronological order of my modeling hobby. Subsequent posts will have more detailed information. Enjoy!]


Minicraft Catalina PBY-5A 1:144

This Catalina PBY represents my first entrance into the scale modeling hobby. It's a storied plane with an amazing history, and it's certainly worth a build. However, it's clear to me now that starting off the hobby by attempting a 1:144 scale (of anything) was much too ambitious, and as the results indicate, far beyond my skill level. The scale is simply too small for a beginner to work with.
 
Regardless, I learned quite a bit. The most important lesson on this model was to avoid getting discouraged. Sometimes things don't fit. Sometimes instructions are written poorly. Scale models are no different than life. Don't stop because it's not perfect. Don't ignore it because it doesn't make sense. Don't give up if the end product looks like crap. This model was a disaster, but I didn't let that bother me (too much). I figured my next model would look better (and it did). 

Another valuable lesson learned was to feel comfortable ignoring the instructions. I thought it was lame to have a .50 caliber machine gun hidden behind glass. I went ahead and used an exacto blade to poke a hole through the window to give it some life:


Remember: This is your model. It's going in your home. You have to look at it. The folks that write up the directions are not your overlords. Feel free to ignore them.

Otherwise, this model was tough for a beginner. As you can see, it was difficult to get the eyeball turret to properly align (the rest of the model had similar results): 


Finally, this model is tail heavy. If I did it again I'd put some weight in the nose. I found out too late that the nose gear opening was too small to add a bb or two:


Here's the final product. I declined to add decals, though it came with plenty. I used Model Master Flat Sea Blue but applied it (incorrectly and heavily) with a brush. I think it's a beautiful color and I wouldn't hold my shoddy work against it.


Another angle showing the heavy rear end:


In the end, this was a difficult build for a beginner. It truly tried my patience and could have easily turned me off of the modeling hobby. But I won't hold that against Minicraft or the 1:144 scale as a whole. I suspect my grief was a result of my own lack of skill, tools, and experience. I've advanced somewhat in the hobby since I built this plane and I'm looking forward to building it in a 1:48.

The 1:144 has it's place in aviation models, but "first timers" is not it.

Happy Building!

Jeff


While The Glue is Drying:
 

If you want an example of how awesome this same model can be, check out this guys post over at Modeling Madness. He has some great links to the history of the PBY as well.